


$5 Shipping on All Ready-to-Ship Items.
Made to Order Shipping Starting at $6.90.
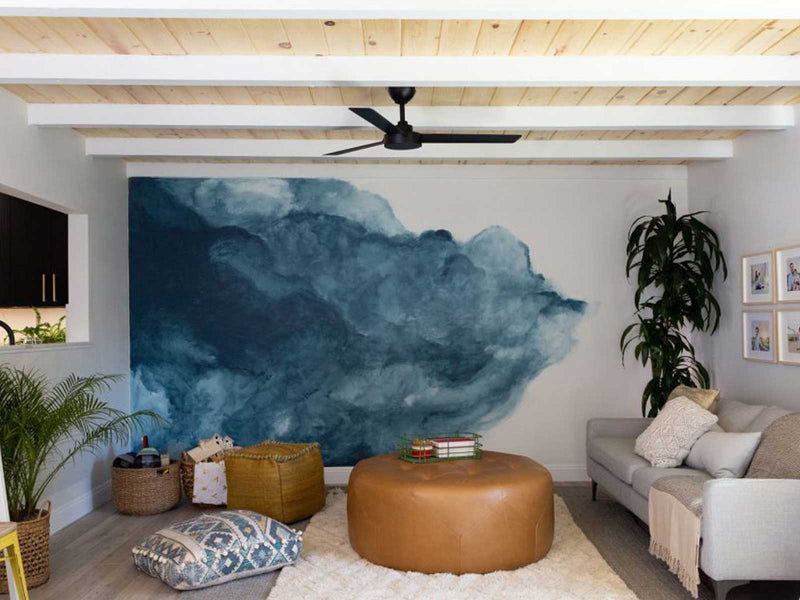
Some of the coolest projects we’ve done on Hidden Potential are actually so easy to do – you just need to be ready to make a change and really go for it! On Season 2, Episode 5 “From Beige to Beautiful,” my good friend Kim Frost of Ripe Designs helped me create this awesome Painted Waves Wall Mural for the homeowners. The home’s design leans Scandinavian with lots of neutral tones throughout, so this mural was the perfect way to infuse the space with some movement and color. It’s totally custom, totally cool and feels really fresh and modern.

You’re probably looking at this wall thinking, “No way, Jas! I can’t pull that off.” But it’s seriously SO easy. I know you can do it. To help you figure out the concept before you get started, I included this clip from the episode below that shows Kim and me painting the wall. You really can’t mess this up, I promise. If you’re having fun with it, it will come out great!

Tape off the edges of your wall with painters tape so the mural doesn’t bleed over onto your other walls. Lay your drop cloth down right at the edge of your wall on the floor so you don’t drip paint everywhere and make a mess.
Dilute the paint. Take some of your paint and pour it into a container. Dilute the paint with water until the liquid is thin and resembles the same consistency as water. Mix well.
Wet your entire wall with a spray bottle filled with water. The wall should be shiny from the moisture, but not dripping wet.

Dip your painting mitt into your diluted paint. Start swirling your mitt around on the wall to create a wave-like effect. We made our mural fade from dark to light across the wall to really drive home the wave effect. This can be achieved by swirling more coats on one side of the wall, using a heavier hand with the paint mixture, and using less and less paint as you cross the wall. This will give it an ombre look. You can recreate the same look we did, or try your own pattern! Have fun with it!


Hey , I was wondering if u had a problem with lint coming off your painting mitt and onto your wall? I started this project but found gobs of lint on my wall and am unsure of what to do about it.
Thanks
Lindsey
on February 08, 2023
All blog comments are checked prior to publishing