


$5 Shipping on All Ready-to-Ship Items.
Made to Order Shipping Starting at $6.90.

Justin & Rachelle Help I Wrecked My House Season 2 Episode 8
$120,000
When Justin and Rachelle bought this house they were newly married and so excited to live together. Even though they didn’t have much DIY experience, they knew the home would need a lot of work and they were okay with that. Next thing you know, the projects started piling up. And somewhere in the mix, they added two kids to their family. Rachelle’s dream was to completely redo the house some day, but by the time I showed up it had been three years and not much progress in the right direction. Justin’s dad, Keith, would come over and help with projects on the weekend, but neither of them had any formal training. When they’d run into a snag with a project, they’d leave it (like a huge hole in the family room wall where they thought about creating an open concept) or they’d take on something without researching it enough (like putting wood on a fireplace surround, which is a huge fire hazard). They were spending all of their time on projects and not enjoying true family time. Plus, they were way in over their heads.
I wanted to come in and help this family address their biggest pain points with this home. The first of which was the entry: everything piled up there at the front door, so we needed to add an attractive storage solution. We also needed to make the fireplace fire-safe, try to take down the wall between the kitchen and family room to open up sight lines, and make the kitchen safe and functional. We also were tasked with checking out the powder room where Justin said his dad might have cut into a pipe of some sort. We had a lot to do, and six weeks to do it. My goal was to give weekends back to this family, make their home safe and beautiful, and take the projects off of their plate.
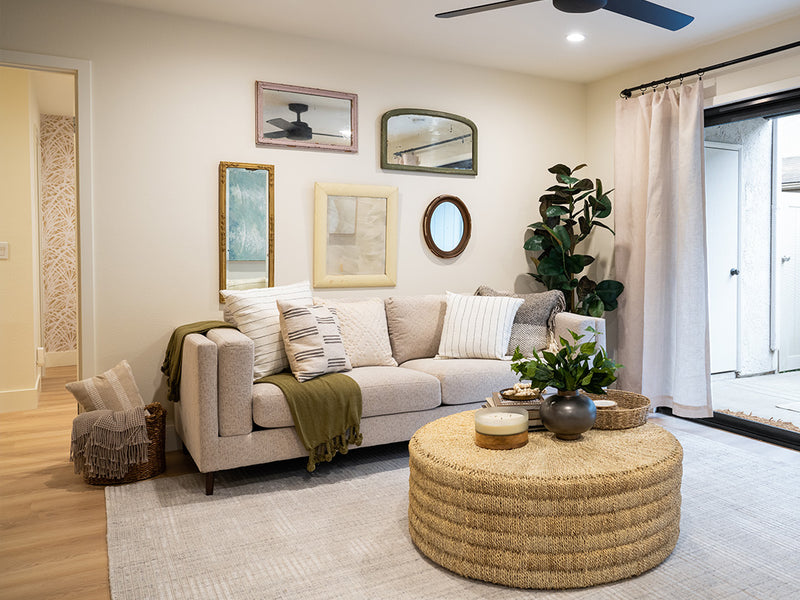
 Contractor Scott and I pulled up the tile and saw the slab underneath, we realized that the foundation was in great shape. So we moved full speed ahead and put in beautiful laminate hardwood floors that are light, bright and beachy but durable and water resistant. Installing all new flooring cost $6,500. Adding in cozy furniture with a California casual feel makes this the perfect hub for the family to relax and spend time together.


Wall Art // Jute Rug // Pouf // Side Table
Justin and his dad made the fireplace updates that were there before, but they’d never lit a fire in it – Justin began to get nervous about all of the wood they installed around the firebox. Well, it’s a good thing they never lit a fire – they would have had a big problem! Fireboxes have to be surrounded with noncombustible material, which is 100% not wood. Even though they did a nice job on the framing, Scott and I had to take apart all of the work they did so we could make the fireplace safe and to code. We replaced the wood framing with steel framing and closed it back up, and this time we surrounded the firebox with marble ($1,800). Then we installed a really cool grasscloth wallpaper on the fireplace ($600) wall to bring in another texture. PRO TIP: Always use at least two textures on your fireplace – here we used marble and grasscloth. All in all, this fireplace is now safe, and the project cost us $3,500.

Coffee Table // Wooden Beads // Jute Rug // Fireplace Logs // Pouf

Below you can see the wall that we removed to open up the kitchen to the family room. We upped the cozy, comfy factor in this room by bringing in lots of textures.

Even though Justin and his dad didn’t have much luck with the DIY stuff in this house, I still wanted them to feel some sense of accomplishment with the project overall. So I had them come in and help me make these cool caned cabinet doors that conceal the electronics for the TV and cable. By using caning instead of an actual wood door, whatever is behind the caning will still respond to a remote control since it’s sort of like mesh. We started by taking caning that we dunked in water and soaked for at least 15 minutes. This causes the material to expand so you can work with it more easily. While it was soft we installed them on cabinet doors that were cut out with squares for each section of caning. Once dry, the caning contracted and became taught, and then it was trimmed down and the door was installed. Pretty cool, right? And I think they did an awesome job!


The entryway of this home was a huge pain point for Rachelle. As you can see under that mirror, all of the shoes and everything else just piled up right at the front door and were visible from the family room in a less than appealing way. Justin even tried pulling up the carpet in this room, but stopped while he was at it – and then people ended up tripping on the carpet pretty regularly. So not only did we take down that wall between the family room and kitchen (the one with the exploratory hole in it!), but we added a super functional command center to organize all the things.

I wanted to help this family remove the clutter from the front door area and give them a really functional command station. But because this area is visible from the family room and the kitchen, I wanted it to be really pleasing to the eye and very purposeful with organization. Now the these built-in “lockers,” as Rachelle called them (props to her for sourcing the idea in the first place!) will catch the clutter and change the way this family operates on a day-to-day basis. Final cost: $2,800.

Wicker Basket // Coiled Rope Baskets // Wood Top Canisters // Marble Tray // Hooks


The final cost for the living room: $30,000.

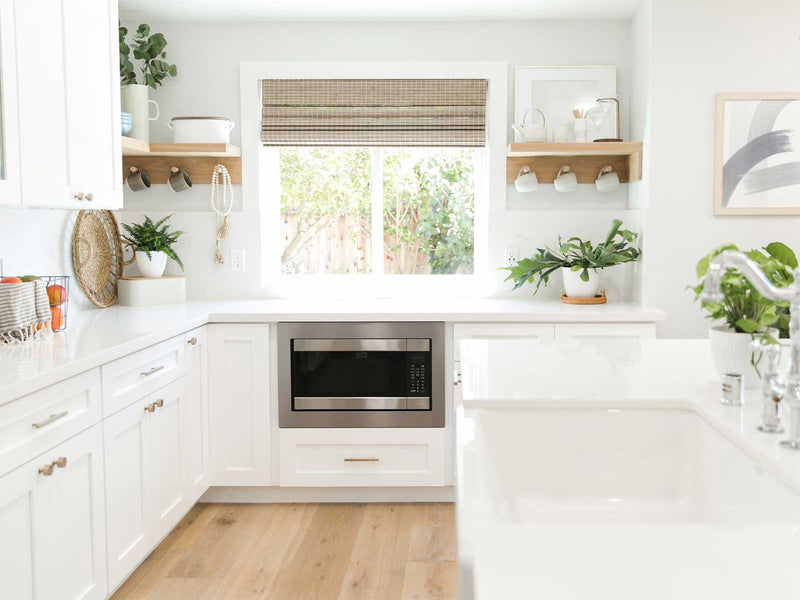
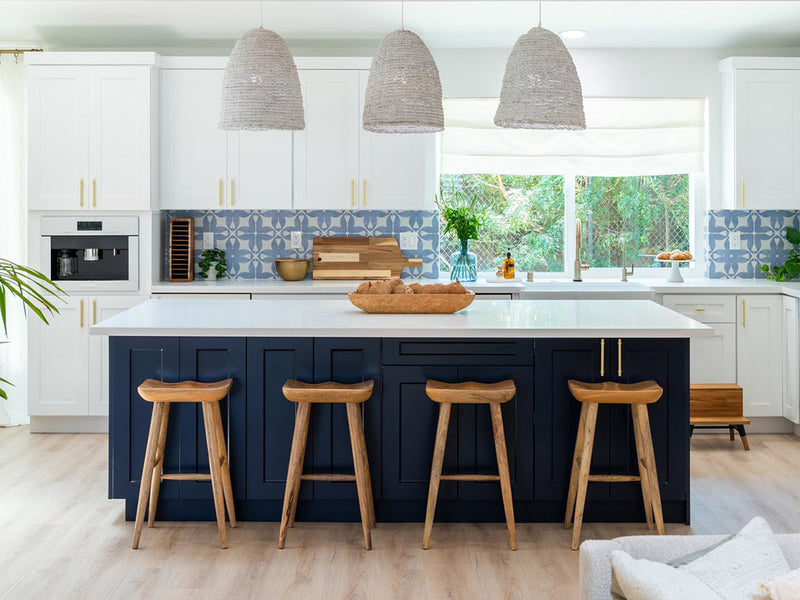
The kitchen definitely needed some TLC. For starters, Justin and Rachelle bought a panel-ready dishwasher before they even knew what their new cabinets would be. Why is that a problem? Because the cabinet panel weighs down the dishwasher door – without it, the door springs up quickly. Rachelle learned that the hard way. And in installing the dishwasher, they pulled up the old tile to make the appliance fit, but never got around to replacing the tile they tore out. That’s why you see those wood pieces on the floor. Aside from that, I wanted to rethink this entire kitchen. We closed off the doorway on the right so cabinetry could run the whole length and we could move the fridge down. We left the sink and dishwasher in pretty much the same location and added in a nice big island with seating. The new island is a nice pop of dark navy blue, so this isn’t just a plain, neutral kitchen. I chose a pretty white quartz countertop for the kitchen which is perfect for a young family because the material won’t etch or stain. The kitchen is now unrecognizable from before.

We went with Shaker style cabinets for a beachy and classic look. The island, which might be the biggest island my team has ever installed, cost $5,500. The new cabinets and island ran us $19,500.


Refrigerator Hardware // Utensil Holder // Wood Top Canisters


Since we chose a crisp white countertop with white cabinets, I had the opportunity to go bold with the backsplash. And since I didn’t have any pattern I was using anywhere else in the whole project, I went bold! The backsplash tile cost $2,250 and I think it really makes the kitchen design.


Blue Vase // Cake Stand // Water Filter Faucet // Step Stool


Utensil Holder // Cutting Board // Brass Bowl

I wanted to create a transitional component in the kitchen island that could allow the kids to be present in the kitchen when meals were being made, but could also switch to regular storage later in life. So I came up with this concept to make a kids’ fort in the side of the island. We lined the inside with white oak and added shelves for books ($450). I also had a custom cushion made out of an old sail’s fabric because it’s both durable and has that cool, coastal factor at the same time. That sail and upholstery combined cost $600. All in all, the fort is a fun place for the kids to use while in the kitchen with Justin and Rachelle. I wish I had one of these when I was a kid!


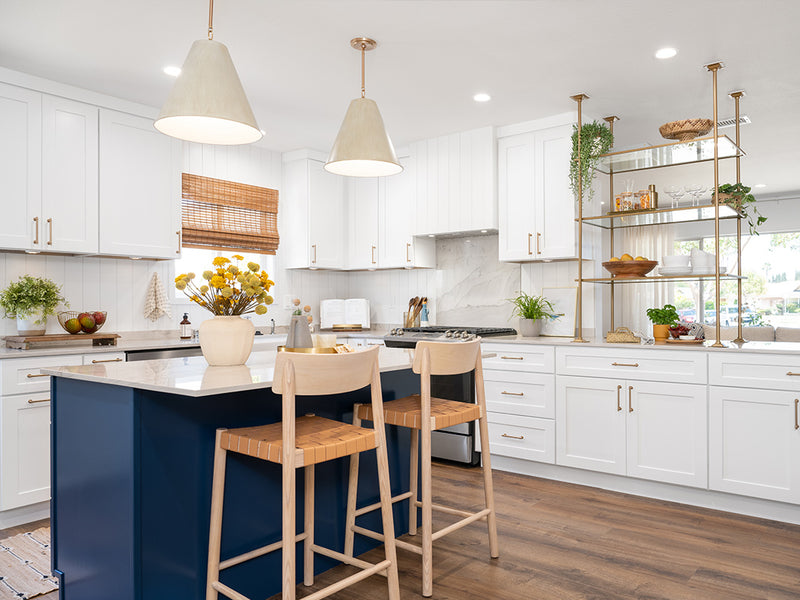
For the eat-in dining area we closed up the sliding door you see on the left because they never used it. This gave us the opportunity to use the entire wall in the dining area for a bar and not having a door there meant the dining table could be even bigger. We replaced the window with French doors to the backyard to create a flow that makes more sense for this space. Taking out the existing peninsula also really opened up the kitchen.


Jute Rug // Dining Table // Light Fixture // Beach Art // Lockers // Bar Tool Set


The white paint, new flooring and swapped-out doors for windows made this room feel so much bigger and more functional for the family.


When I first toured the kitchen, Justin and Rachelle showed me the commercial range that came with their house. Not only is it odd for a residence to have a commercial range, but it was not working properly. It always felt hot – even when it wasn’t turned on – and they didn’t know why. That’s a red flag that should be addressed immediately, folks. Upon closer inspection, Scott said that the range was supposed to have fire suppression, but didn’t. I needed to get this huge thing out of there. Once we removed the commercial range and started to remove the wall between the kitchen and the family room, we found a drain line in the wall where the range used to be. We had to spend $3,000 to reroute the plumbing around to the new sink and refrigerator because of what we found. Since most of my contingency was wiped out with that expense, I sold the old appliances to recoup $1,650. Now, you’re probably looking at the “Before” photo thinking, “but that wall is load-bearing, right?” It is. So we brought in a 17-foot-long beam to carry the footing of the ceiling after we removed the wall. It cost $15,000, had to be delivered on a flat bed truck, and was a beast. Just a reminder that taking down a wall is not something they should have ever thought of doing on their own.

Upon first glance, this bathroom looks fine. But it’s what you don’t see that was the problem. In trying to wire a new light for this bathroom, Justin’s dad cut into a vent pipe. Once I cut open the wall to explore what was going on, I also saw that the light plate for the fixture was ziptied in place to a pipe in the wall. There was also a live, cut wire in the ceiling. Jazzy PSA: Please never attempt electrical on your own! I brought out an electrician and plumber to make sure everything looked okay before we got this bathroom back on track. Once we did that we patched and painted the walls and put it all back together.

We added a new mirror, new vanity, new light fixture and new plumbing fixtures. We also installed an oak plywood backsplash ($250) to bring some organic texture into this room – since there’s no shower or tub in this bathroom, we can use wood in here because there’s less moisture occurring. Final bathroom cost: $5,000.

Faucet // Rattan Vanity Sconce // Mirror // Vanity // Artwork
The final budget cost for the whole project was $119,996 – that’s $4 under budget! Now Justin and Rachelle can spend quality weekend time with their family doing fun things instead of working on endless house projects. Which to me, is priceless!

A very special shout-out to Found Rental Co. for helping us style this home, from the furniture to the decor and everything in between!


WHERE ARE THE PENDENT LIGHTS ABOVE THE ISLAND FROM?
SAMMI
on November 12, 2022
All blog comments are checked prior to publishing