


$5 Shipping on All Ready-to-Ship Items.
Made to Order Shipping Starting at $6.90.


Jasmine and Brett
$200,000
It is such a huge honor to be the cover and guest editor of HGTV Magazine for the month of October! When I found out the news, I knew I had to go big. Being the guest editor meant I would pitch story ideas, write my very own editor’s note, have a full cover story of one of my projects, and give my professional tips and advice throughout the magazine. We could have done the photoshoot and cover story of a past project of mine, but what fun would that have been?! Having just looked at a family cabin in the San Bernardino Mountains that I was hoping to work on in my spare time, it seemed like the perfect project for HGTV Magazine. But that meant instead of leisurely working on this home renovation, we had to act fast for the finished home to make the cover of the magazine. And there was a lot of work to do on both the exterior and interior.
I purchased this cabin without Brett even seeing it in person, but I could tell it had a lot of potential—it was a quintessential A-frame cabin only 100 miles from our home. Hazel saw a photo of the cabin and said, “Hazel’s Cozy Cabin!”, which was totally adorable, so it stuck and became the name for this next project of mine. We had five weeks to completely renovate our Arrowbear, CA cabin…the pressure was definitely on!
My goal for this project was to create a getaway that felt like a summer camp, a place where you can sit back, relax, and put your feet up. I wanted this cabin to be a change of scenery that family and friends could come visit during the summer and winter months. We had to rip everything out of the old home and make this cabin magazine cover ready. The ceiling had to be sanded, the floors had to be replaced, the kitchen had to be gutted and made custom, the home had to be painted…but we’ll get into all the details in a bit.
After meeting with the HGTV Magazine team at their headquarters in New York City and seeing a mock cover with the original home on the front, I realized just how much I had to deliver. It was rare for the HGTV editors to put an exterior of a home on the cover, so once again, the pressure was on. I decided to stick with a sophisticated summer camp design style, something very family forward and fun, but also it had to have a lot of visual interest incorporating a lot of different materials that you maybe hadn’t seen before. There was absolutely no time to waste.

Sherwin-Williams Paint - Black Fox // Sherwin-Williams Paint - Pure White // Sherwin-Williams Paint - Accessible Beige // Plaid Wallpaper // Dishwasher Faux Bois // Gingham Wallpaper

Curved Sofa // Nola Frame // Biscayne Dining Bench // Baruna Nightstand // Hudson Sofa // Rory Throw Pillow // Ashland Outdoor Dining Chair // Knoxville Dresser // Harper Throw Blanket


Since the plan was for the exterior of the cabin to be the cover of HGTV Magazine, we had to make sure it looked just as good as the interior of the home. Brett and I both wanted to paint it a darker color, since it was our little cozy cabin in the mountains. We would paint the entire house, add new landscaping, rip off the entire deck and replace it with a new, Timbertech composite decking system with a skirt that leads all the way down to the ground. Painting the house all one color changes what you focus on, and instead of seeing white rails and white trim, you’re going to see the windows and the new wood dutch door, which is exactly what I wanted the focus on. I also wanted the driveway to be lined with tall evergreen trees to give it a private feeling.

I love that this home has a front deck for hanging out and entertaining. We were able to put a sophisticated BBQ set up in this area for grilling and cooking (which we love to do back at home!). I added a special, custom coffee shop-style window decal to the front window for something really different, unique, and fun. Plus, it would act as a sweet reminder that Hazel named the cabin and the year we renovated and made it our own. I’m looking forward to this front space being a relaxing oasis throughout the different seasons.
I’m thrilled with how the exterior of the home looks on the cover of HGTV Magazine. I’m still so honored to have this opportunity! Here’s a Before and After shot so you can see how our vision came to life.


I liked that this cabin had an open floor plan that connects the living room, dining room, and kitchen. I decided to install luxury vinyl plank flooring that would look like polished concrete. LVP is a far superior product than linoleum, and a great way to save money on flooring. Since the ceiling was such a standout feature of the home that instantly drew your eyes up, I wanted the flooring to be a study in a different material (in this case, concrete) and a lighter color. Instead of staining or bleaching the ceilings, we went with sanding them, and the color came out perfect. We didn’t have to do anything else to these ceilings! Now that the ceilings were accentuated, the cabin would feel a lot brighter and lighter.


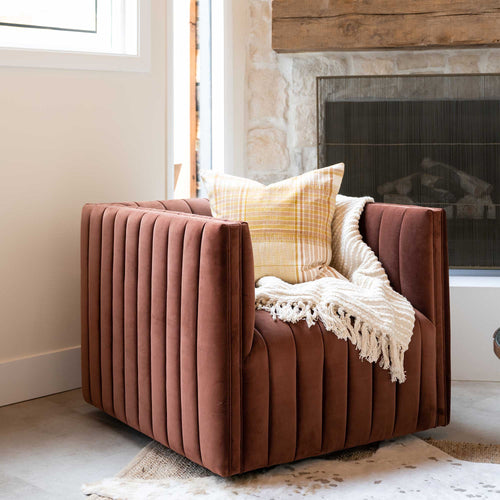
Every cozy cabin needs a fireplace, and I couldn’t wait to make this one a standout architectural feature in the home. We took the existing stone down, along with the old mantle. Then we added new stone from El Dorado Stone and we placed it from the floor to ceiling, along with a new beam that lands in the new stone in a sculptural way. Above the new reclaimed wood mantle, I installed a TV that looks like art that blends in with the rest of the cabin’s aesthetic. We over-grouted the stone so instead of it having a lot of variation, it looks and feels almost smooth. Having the stone run from the floor to ceiling in this corner definitely makes the room feel bigger.
You know about my love for swivel chairs, especially in living rooms with fireplaces so I added one here. The great thing about the Freeport Swivel Chair is you can use it for a solo reading session in front of the fire or swivel it towards the couch for game night or group conversations.
After the room as a whole was renovated, I focused on the small details that make it feel like a cozy cabin and a place where we could enjoy the freedom of being in the woods and out in nature. I added colorful art from Lindsay Letters and some tonal vases, candles and greenery.


I decided to add another stone wall opposite the living room with its stone fireplace to provide some continuity within the open floor plan. It definitely upped the rustic feel and provided the perfect backdrop for our dining bench and dining table. The Biscayne Dining Bench was a great alternative to adding a built-in banquette. Here we just used the banquette bench and it allowed us to move the table closer to the wall so everything could fit.
I added two bar stools for additional seating on the peninsula in the kitchen. It’s the perfect little area for my family to enjoy our meals in the cabin. Next to the dining area I was able to squeeze in a mini-mudroom in the form of a custom built-in. It’s as functional as we need it to be - a place to house some of our gear and some firewood.


My goal for this kitchen was to have it feel like one big space, instead of two separate kitchens due the strange layout. I used quartzite from my go-to vendor Marbleyard for the countertops. I love the contrast between the stone wall and the smooth quartzite. The waterfall counter continues all the way down to the ground, bringing your eyes back up and over to the wall with the range. I also added in blinds from 3 Day Blinds in a color that matched the cabinetry. The blinds really add a continuity to the space at eye level that make the cabin feel finished.
I had cabinetry built in and installed all the way around the kitchen to maximize storage and give small appliances a place to live. I added a dishwasher and wanted all of the appliances to be panel ready in order to blend in seamlessly with the rest of the kitchen. I was thrilled with the range we chose. The black with brass details gave it a timeless yet modern look.
I love our Kohler kitchen sink and because it’s an undermount fixture, it creates a seamless look with the quartzite countertops. That helped us maximize the expansive look we wanted in our space space kitchen.


Moving through the house, the primary bedroom is just behind the kitchen—hey, that’s cabin life! I wanted this primary bedroom to feel sophisticated, but also really cozy. I added plaid wallpaper from Wallshoppe on the ceiling for an unexpected touch that the room needed. This room was small and plain when we first started renovating it, so it needed an overdose of texture and pattern.


The main bedroom included a separate little space that could be used as an office or nursery. I decided that for now, it makes a great space for Hazel to sleep while she’s still young. I came across a set of vintage doors from my friends at Through the Porthole that were perfect to separate Hazel’s room from mine and Brett’s room since there wasn’t room for a swinging door.


Heading upstairs, I decided to go with carpet on the stairs. I chose a pattern that was so ugly it was good. Right?! The plaid carpet from Michael’s Carpets in Huntington Beach reminded me of an old school vibe that you would find in a classic cabin, but because of the renovations and modern touches, I knew I could get away with using it.


The upstairs loft will be used for different purposes, a place for family and friends to stay, a play area for Hazel, a hangout for snowy days…the list goes on! So I had to come up with some creative solutions here. I also wanted the design to be a little more bold than the rest of the house. I imagined elevated bunk beds up here, and wanted them symmetrical within the room.


Each bunk bed is a queen size bed, so they’re comfortable enough for adults to stay in. It’s another nod to a summer camp getaway that I couldn’t resist. And to top it all off, I painted these bunk beds a bright, cheerful yellow to add a pop of color.

I loved using the waist-high space across from the bunk beds for a display and storage nook for all of Hazel’s toys and books. It made use of a space that would otherwise sit empty and I’m always looking for places to tuck in some family necessities that are hard to find homes for.


The upstairs bathroom was a good size and we kept the layout pretty much the same. However, it did get a total facelift. I incorporated a quartzite slab in the shower that featured river rock pieces which matched the coloring of the mountains we have up here in the San Bernardino National Forest. There’s a natural finish on the slab, so when the water hits it the color is enhanced, but when it dries it goes back to its original color. Once again, Kohler and Zia Tile were my go-to companies to bring my vision to life and to make this bathroom a thing of beauty. The large window in the shower makes it feel like you’re up in an outdoor shower in a secluded treehouse, which I have to say, is pretty awesome.


That’s a wrap! It was such a dream to see this project come to life. To see our own little cabin on the cover and within the pages of HGTV Magazine is seriously a dream come true. This project meant a lot to me because I got to hang out with my family and show them what I do from start to finish. I’m looking forward to all of the fun memories that the Roth family will create in Hazel’s Cozy Cabin, and we’re definitely off to a good start.
Thank you for following along on this project and all of my ‘Help! I Wrecked My House’ Season 3 episodes. Each family is so special in their own way and I’m always humbled when I’m asked to jump in and help someone build their own happy. And if you haven’t already, don’t forget to pick up a copy of HGTV Magazine to see more inspiration that I made sure to pack into the October issue.
In the meantime, get ready for a whole new house next Saturday, October 8th 9pm ET/PT when I help a family handle some serious issues that are keeping them up at night, and have been for way too long. You won’t want to miss Episode 7 of 'Help! I Wrecked My House'. See you there!


A stunning transformation! I wish more shows would feature nighttime shots of distinctive rooms. I’d love to see your living room illuminated by that killer chandelier!
Chris B
on October 04, 2022
Thank you for your ideas.We have been redoing our house in Big Bear California not to far from your cutie little cabin. I have been stuck with my window treatments! Look forward to watching!
JoAnn Flynn
on October 04, 2022
Loved everything about the project and the show. Just one question-is there a bathroom on the first floor that just wasn’t on the show?
Sharon
on October 04, 2022
IN THE ENTRY, THE ROUND LIGHT HANGING FROM THE CEILING OR WHAT EVER IT IS. WHAT IS IT AND WHERE DID YOU GET IT?
DEE
on October 04, 2022
All blog comments are checked prior to publishing